share

Showing posts with label equipment. Show all posts

Sunday, June 3, 2012

A Word on A-TACS

A-TACSThe A-TACS camo pattern has been in development for a some time, but they are just now starting to gain the momentum and popularity that they deserve. They were testing the A-TACS about the same time as the multicam, and as we all know multicam was chosen. They did this because the multicam will work in a larger array of environments as opposed to the sand washed looking A-TACS. If they are utilized in the right environment, however, the sand pattern can make its wearer almost invisible.

When it was first developed, the A-TACS came in one color pattern, desert. While it worked great in desert environments, if the wearer patrolled into an area with any vegetation, they would be obvious for everyone to see. The solution was to incorporate some green into the pattern. This produced the Foliage Green A-TACS. This pattern is the exact opposite of the Desert A-TACS because it will work wonders in an environment with vegetation, but not in the desert.  

Finding a camo pattern that will work in every environment equally is next to impossible. The A-TACS’s most prevalent weakness is that they are terrain specific. Don’t let this discredit what the A-TACS have to offer. If you are working on a border between a desert and a jungle, wear multicam. If you know the type of terrain you will be dealing with and have no expectations of leaving that environment anytime soon, choose the appropriate A-TACS camo.

As much of a fan as I am of A-TACS, I’ll admit that there is still some development that needs to be done before this type of camo can reach its true potential. It is certainly a step in the right direction and it is exciting to see the avenues that we are beginning to explore in our choice of camouflage.

Saturday, May 5, 2012

Using Binos for Recon Photos

When your task is to go out and recon an area or a particular target, the best information you can bring back is in the form of pictures or video, so naturally you would bring a capable camera. What if you stumble upon intelligence all of a sudden and you don't have a camera and the the distance is too far for you phone to take a picture? If you have a phone and a set of binoculars, you are in luck! Here is a technique that will blow your mind and will enable you to gather intelligence like never before.

All you have to do to get a picture from a great distance with you phone is to hold your camera lens up to you binoculars. This will enable you to take a picture at distance without having to carry another bulky piece of equipment like an actual camera. If you are an iPhone user like me, you know that its camera takes pretty good pictures, and speaking from experience, it works incredibly well for this technique. Here is an example, I took this picture of a suspicious character from about 300 yards away...


As you can see, the clarity is pretty good, but you still have to deal with the black outline. Not a big deal, but the other great benefit of this is that you can magnify the picture on you iPhone and you will have this instead...


Not bad for being approximately 300 yards away! You can further improve this technique by using a spotting scope instead of binos. Along with pictures, you this method also works equally as well for video.

I've researched this technique a little on the internet and I came across a piece of equipment that will make this easier. Meopta MeoPix iScoping Adapter for the iPhone 4 and 4S allows you to connect your iPhone to binos or a spotting scope. This way you do not have to manage two elements at once. I have not been able to try this device yet, but I am hoping to soon so that I gave give it a thorough field test.

This is an example of how innovation can allow you to be more proficient at preforming recon. Intel can present itself at anytime and you may not always be prepared for it. If you did not bring a camera with you, this is a great method that doles not require any more equipment than what you would usually carry. Give it a try and see what you think.

Thursday, May 3, 2012

The Invaluable Dump Pouch


If there is one piece of equipment that is overlooked, it is the dump pouch. This simple, yet potentially vital piece of gear adds a storage compartment to your person when cargo pockets just won't cut it.What is it good for you might ask? It is good for any number of applications whether it be on the range or in the field. It's not flashy, it's not sexy, but it is very effective for its purpose and it can make your life a whole lot easier when you least expect it. Here's how...

Let's say you are in the field. You have your hooch set up, you are feeling comfortable, then all of a sudden hell breaks loose and you have to evacuate your site fast! You don't have time to pack your ruck up, but fortunately for you, there's a dump pouch resting on your belt. You open it up and throw an MRE in there, along with extra mags and some 550 cord. With these items, you are prepared to survive a little while longer until help arrives. Without the dump pouch, you would be forced to carry any extra items in you hands. Not very effective for a hasty retreat. Of course, where you will probably find yourself using a dump pouch most is at the range. These little guys are handy for holding all your extra magazines so you don't have them clunking around in your cargo pockets.

Maxpedition MEGA ROLLYPOLY™ Folding Dump PouchAll a dump pouch consists of is a pouch that can be rolled up and buckled so that fit on your belt without taking up much space. A lot of manufacturers make versions of this, but the most popular is Maxpedition's dump pouch. It's small when rolled up, so it won't get in the way of your movement, or get caught on branches if you have to negotiate brush. Should you need it, simply undo the velcro and the pouch will unroll. When the items are in the dump pouch you can secure it with the elastic strap at the top to keep the contents in. When you want to store it for later use, just roll it back up and redo the velcro tab.


You can find many more uses for a dump pouch when you start finding how annoying those extra odds and ends feel clunking around in your cargo pockets. Like I said before, they are not sexy, so don't expect to see these being worn in the next great action flick. For the real operator, however, you will find these to be an invaluable piece to your gear set up. If for nothing else than to have just in case you need to move locations quickly and don't have time to gather up all your gear. Stay safe out there!


US Standard Issue

Perhaps one of the greatest hook ups you have if you are active military or employed by a federal officer is your access to US Standard Issue. I have bought many products off of this company, and I have always been happy with my purchase.

For those of you who have not experienced the joy of belonging to US Standard Issue, you are missing out! What they do is offer Oakley products such as sunglasses and boots for a huge discount, most of the items on the website are as much as 50% off. It is a great place to go if you are looking for quality products but don't want to pay the retail price. I have bought a couple pairs of sunglasses from them and they have lasted me 3 years of hard use. If you scratch up your lenses, you can buy a new set to plug into your existing frames. They also offer the Oakley hard knuckle gloves in black and tan. I used these gloves all up until I got a pair of Wiley-X, and I'm thinking now about going back to the Oakley's because the quality is obviously better.

In order to sign up for their program, you have to submit a photo of your military ID or credentials along with a quick application. They will review your submission and if you qualify (anyone with these forms of ID will,) you will be granted access to their site. Until you are approved, you can view their inventory, but not the price of the items. Other rules apply with membership to the program such as not making a purchase to give as a gift.

I give Oakley my respect for giving men and women, who put their lives on the line for this country, a program that offers them quality for such a large discount. This is a great program if your department is not provided with the quality equipment you want or need. If you meet the qualifications for this program, I highly encourage you to check them out and do yourself a major favor by not paying out the rear for equipment you need.

Monday, April 30, 2012

Mounting the GoPro HD Hero2 on Your Rifle

I recently purchased the GoPro HD Hero 2 and my first thought was “How can I mount this on my rifle?” This was one of those wazoo ideas that popped into my head and I became dedicated to the idea. After doing a little research, I found a set up that would allow me to bring this idea to fruitation. Keep in mind that this set up is based on how I personally have my weapon set up.
For those who are not familiar with the GoPro Hero cameras, they are durable water proof cameras that can be mounted to almost anything you can imagine. They feature a wide angle lens that allows you to capture everything about your experience. If you choose to buy the HD Hero, you are limited to HD in a narrow angle and standard definition in wide angle, but if you get the HD Hero 2 you can capture both in HD.You can find numerous videos on YouTube of how people have used them to capture their extreme stunts. So how would one mount it to a rifle?

First and foremost I needed to find a mount. The first few searches I did only resulted in mounts for .22 rifles and they certainly would not hold up to the recoil of a higher caliber weapon. Then I came across StrikeMark, and found that they offer multiple forms of rails for the GoPro, even a pistol mount! I thought about it for a while before purchasing their standard picatinny mount. It was only $30, but I wanted to be sure that it would compliment the configuration I was imagining.

Next, I purchased an angled rail to offset the camera a little more. This way the camera wouldn't be in the way of transition drills and I would be able to capture more of the rifle. This is not a common part to come by and often it has to be found online. Just for kicks, I went to my local tac store to see if they had any, and to my surprise they did!

I went home, quickly mounted the camera to my AR and it gave a whole new look and feel to my rifle that was perfect for the CDI factor. Here is what it looked like...


The next day we hit the range and I was able to put it to the test. It worked EXCELLENTLY! I did notice that while the extra weight was only a little, it was still enough to cause me some adjustment. No biggie, because I intended this project to be for TRAINING PURPOSES ONLY! This was especially true because should you have to switch sides to shoot, the camera would be in the way of your vision if you keep both eyes open.

 
I definitely would not carry this set up into the field because it would be in the way more than anything. I would much rather have the NVG mount for the GoPro which attaches to most helmet shrouds (stay tuned for that post.) Also, and this is a personal opinion, if I get into a shootout I don't want it to be on video. For training purposes, however, it can serve a purpose to see where your barrel is pointing at which would be great for CQC training. If you are interested in a similar set up and have any questions, feel free to ask.

Saturday, April 28, 2012

Dual NVGs Vs. Mono NVGs

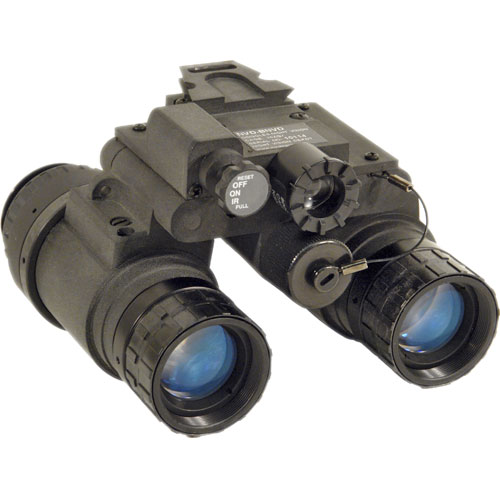
There's no doubt that the ability to function in the dark is key to combat success. The more we are able to turn the darkness into our ally, the more of a threat we become to the enemy. Therefore, utilizing helmet mounted NVGs (Night Vision Goggles) is vital to mission success. There are two main options you have to consider dual for both eyes or mono for one. Both work excellent for their purpose, but one is not entirely better than the other. It all comes down to necessity for the mission.
 
Dual NVGs:
This is an excellent choice for when you expect to be operating in the dark for an extended period of time because the eye relief is excellent unlike the mono's. Combine this with a weapon mounted IR laser and you become deadly on the battlefield. Dual NVGs allow the user to quickly scan, acquire targets, and handle them accordingly without having to stress one eye to do all the seeing. The drawback to the dual NVGs, however, is that they cover both eyes. While this as an excellent feature, it can also be its greatest error to the user in contingency situations. For example, if the dual NVG's go down, you are forced to use your flashlight and give away your position, or wait for your eyes to adjust which takes approximately 20 minutes. Another drawback is that should you have to use your weapon's optic because your laser went down or you never had one to begin with, your ability to see your target is lost as your eyes have not been able to adjust. Also, I would strongly recommend counter weight for the back of your helmet as these are heavier than the monos.
 
Pros
  • Excellent eye relief
  • Perfect for long night operations
  • Feel more natural to the user
  • Works well with weapon's IR laser
Cons
  • Eyes will have to adjust to dark should NVG's malfunction
  • Heavier
  • Renders weapon optics useless
 
Mono NVGs:

 
These are the most common NVGs on the market today, and for good reason. Mono NVGs are the most versatile night optics a modern day warrior can own. The most popular of these is the PVS-14, which is used primarily by the military and law enforcement. Unlike the it's bigger brother, the duals, the mono only covers one eye, usually the non aiming eye. While this can cause some users eye stress by having to focus on one eye, it does leave the eye not being  covered ready to negotiate the dark should the NVGs malfunction. This also makes your optic readily accessible with the monos up or down or you prefer not to use an IR laser. Should you have to adjust focus, a simple turn on the ring around the lens is all you need to do. Another benefit to the mono is that they take up considerably less room and can be easily stored in your ruck sack. The problem that I have had with monos is that scanning your surrounding area takes longer since you are looking through a narrower field of view and the clarity may also suffer. Since preferences vary drastically, the mono is a good choice of NVG as there are various different mounts to choose from and other forms of utilization such as a weapon mount if your optic has an IR setting.

 
Pros
  • Highly versatile
  • Only disrupts on eye's night seeing ability
  • Easily stored
  • Multiple gear options
  • Leaves weapon optic as an option
Cons
  • Slightly more eye strain
  • Narrower field of view
  • Clarity issues
The mission will always dictate the proper gear needed for success, but if you are debating between dual and mono NVGs, it is important to know the benefits of each. This way you will be making an informed decision on what to carry into the field. The most important question to consider is "Will this turn the darkness into the best ally that it can be?" Consider this when making your selection and you will be much more successful in your night time operations. Best of luck!

Friday, April 27, 2012

Love for Molle Belts

I use to always go into the field with my BlackHawk S.T.R.I.K.E. vest and it worked great! That was until the summer months came and coupled with a layer of clothing and armor underneath, it got pretty hot at times. Somedays, I would drink up my entire Camelback and still have another half of the shift left to go. I started searching for other options to aleviate the discomfort of profusive sweating, and that brought me to the padded molle belt.

When I first started to consider switching to a padded belt, the CDI (Chicks Dig It) factor was holding me captive to my original vest set up. Finally, I decided to take the lunge and took all the essentials I needed for work and strapped them on to my BlackHawk Padded Patrol Belt. It only took an instant to notice how much lighter and more agile I felt without having gear clunking around in front of me, not to mention the relief in body temperature. I instantly became a fan!

After wearing my belt in the field for some time, I noticed one major flaw, it loosened up on it's own! There were times that I would be on patrol and I would have to stop in order to tighten up my belt so it didn't drag around my thighs. It was getting to the point where I considered reverting back to my vest and forgetting all about the belt idea when I discovered High Speed Gear Inc's Sure-Grip Padded Gear Belt.

Sure-Grip Padded Belt

Unlike the Padded Patrol Belt, the Sure Grip features neoprene on the inside of the belt. This keeps it securely in place once it is on and adds an extra level of comfort to the user. It has enough columns of molle built into it to comfortably carry your equipment. On mine I have my flashbang, pistol, med pouch, two Fast-Mags, knife and radio. The best feature about this belt as opposed to other molle belts is that the inner belt is velcroed in place for a secure fit. After I started using this belt, I knew that my days of using the chest rig was done!

As I said before, I reccomend the molle belts as a way of carrying your essential mission equipment. Depending on the nature of the situation you may want to carry more equipment such as magazines if you are serving a high risk warrant. When the summer months are hot, however, and you just need the essentials, I highly reccomend the molle belt as a way to stay cool and travel lighter. Stay safe!

Wednesday, April 25, 2012

Survival Bracelets: What to Look For

A new trend in gear is the 550 cord survival bracelets. These are nifty little gadgets that can supply you with varying amounts of 550 cord if need any, and you never know when that might be. Before you go buying the coolest looking one though, take a moment to make sure you are getting the best quality for your buck.

First, take a look at how many different colors of cord is in the bracelet. If there multiple colors, it means that the cords are fused at some point and the integrity of the 550lbs test has been compromised. Instead, look for bracelets that are one color and made from one strand of 550 cord.

Don't pay extra for the buckle! Some companies make bracelets using stainless steel latches. While these are very secure, you could save yourself the money by purchasing one with a plastic buckle instead. Just make sure that the buckle is strong enough that you can't just pull it apart.

Make sure it the cord is made in the USA! Other countries like China make knock off versions of 550 cord, but American made paracord still requires it to withstand a 550lbs test. If it doesn't have this stamp of approval, don't waste your time or money.

Paracord bracelets are a very simple piece of gear that is always handy to have on hand. With a little practice, you can make your own. There are plenty of YouTube videos out there that tell you how, but if you are going to purchase one, follow these simple notes to ensure that you are getting a quality product.

5 Quick Upgrades to Improve Your AR-15 Performance


The AR-15 is perhaps the most dynamic and customizable weapon system on the free market today. The amount of gear you can slap on this war horse is almost endless and can become pretty pricey, but how much do you really need to improve how your weapon handles? The truth is that you only need 5 pieces of gear (most relatively cheap) to instantly improve your AR; a sling, foregrip, buffer, buffer spring, and a muzzle break. Before you go investing in that spendy ACOG or EOTech you've been eyeing, try these products first.


The Sling (APRX $30):
The sling is commonly associated as being the means by which you carry your weapon, but if utilized correctly it can provide support to counter the recoil. While slings come in multiple makes and models, I prefer the 2-point slings because of their versatility and simplicity. I’ve ran with the Viking Tactics 2-point sling for years and I love it! To turn your sling into a support base for your shooting position, all you have to do is tighten it to reduce the play in your rifle when aiming down the sights. When preparing to shoot, you should be using a little muscle to keep the sights steady. This is when you know that you have a steady base to shoot from.


The Foregrip: (APRX $65):
Adding a fore grip to your AR-15 will instantly provide you with a steady place to put your support hand on to allow for faster sight acquisition and stability. I am a huge fan of the Tango Down stubby vertical grip. I feels more natural in the hand and the bottom unscrews to allow for storage of extra batteries for electronics. If you do not like the vertical grips, Magpul makes an angled grip that relieves wrist strain for those who prefer not to install traditional foregrips. This is a simple part that takes approximately a minute to install and can benefit the shooter almost immediately. I talk more about the proper use of the foregrip in my post, You're Using Your Foregrip Wrong! Here's Why...

The Buffer (APRX $20-30)
Here is where it starts getting fun because this is a quick swap that will noticeably reduce your recoil the next time you shoot. The manufacturer's buffer, in my opinion, is just a little too light. Installing a heavier buffer will reduce the amount of force being thrown back at you when you shoot since there is more resistance because of the increased weight. If you look at the flat end of it in a Colt AR-15 for example, you will probably see something to the effect of “H1.” This is the lightest buffer they install in their AR's. The next heaviest buffer plug would be the H2. They do make H3 buffers that are the heaviest, but I would shy away from these as they have just a little too much weight for the common AR-15. There are a few other buffer out there, but the one I prefer is the Spike's ST-T2 buffer because it uses tungsten powder as opposed to weights. Just a personal preference, but I am happy with it's results.

The Buffer Spring (APRX $8)
Of course with your heavier buffer, you are going to need a better buffer spring to go along with it. I'll save you all hours of researching and tell you to just go with the Sprinco Blue Spring. This is just strong enough to counter the added weight without causing cycling issues. To date I have put around 3,000 rounds through my AR-15 using the Blue Spring, and I've yet to have ANY issues with it. I have heard of some people using their Red Spring, which is heavier, but I don't see a need for any extra resistance that could cause malfunctions. Even if you don't plan on getting a heavier buffer, the buffer spring needs to be replaced eventually, so take my advice and get yourself a Sprinco Blue Spring.

The Muzzle Break ($135-165):
Muzzle breaks come in many forms from multiple manufacturer's (I'm currently running the SureFire MB556K on mine and I love it!) but they are all intended to reduce the recoil for fast follow-up shots. This is the only part I have listed here that you may consider pricey depending on your budget, but unlike all the other goodies I've talked about, this is the one mod that will drastically boost your shooting performance. Muzzle Breaks are fairly easy to install given the right equipment such as the Hammerhead Rifle Tool. Simply unscrew the existing muzzle break, add the necessary washers, apply a little lock tight, and screw your new break on. This is the most crucial product you will need if your aim is to minimize the felt recoil of your rifle. It makes the weapon a dream to shoot and your follow up shots will dramatically improve!

By installing this equipment on your AR-15, you will be well on your way to better shooting and sitting on Cloud 9 in control heaven! I hope that the named gear suggestions I have made will help you in your search and that the next time you are at the range you will have a better confidence in your weapon and shooting ability.


Tuesday, April 24, 2012

You're Using Your Foregrip Wrong! Here's Why...

Nothing triggers my pet peeve nerve more than seeing someone on the firing line who looks like their are trying to strangle their foregrip. It is an all too common mistake that significantly reduces the effectiveness that having a foregrip can produce. I know many AR shooters who have foregrips on their weapon system and they utilize it in this manner. Before you start running a foregrip or before you continue teaching yourself bad habits, allow me to correct you...

The Correct Method:

First of all, the foregrip should be placed on the bottom of your weapon system (yes, sadly I have seen them mounted on the side) and they should be located as far forward to the tip of the barrel as possible. Now, instead of gripping it, use it as support for your lower three fingers on your support hand. If you have a swivel mount for your sling, you can create a nice nook for your thumb and forefinger if you have it placed just above the foregrip. You will notice that your hands are now in the same configuration as if you were shooting a pistol, just farther apart.


WRONG!


CORRECT


        CORRECT
           (reverse angle)

Why This is Correct:

If you grip the foregrip with the whole fist, you are doing little to improve your accuracy or stability. The fist grip creates a bend in your elbow that will be a focal point for the recoil and it will take longer for follow up shots. If the foregrip is located closer to the magazine well, the recoil will be hardly be reduced at all as there is much of the rifle that is uncontrolled. Although it may look cool having the foregrip farther back, the energy generated from your shot will cause your point of aim to be thrown off. Having your support hand in the position I have described will allow you to quickly attain your sight acquisition and manage the recoil as there is little left of the weapon that you do not have control of.

Now that you are fortified with the knowledge of the correct posture for utilizing the foregrip, you can correct your buddies and see for yourself how they will instantly improve on the firing line. Have fun training and shoot straight!

Faster Reloads with the Magpul B.A.D. Lever


You can clutter your AR with a plethora of gadgets that to help it function better, but what happens when your weapon runs dry and the fight still rages on? You have to get your weapon up and running and get back on the trigger. The time it takes to reload could be the difference between going home that day or taking a long dirt nap. A fast reload is the product of repetitive practice and drills, but the Magpul B.A.D. Lever has made this process slightly faster and can save the operator valuable seconds when they are needed the most. Those that run with the B.A.D. Lever have found it to be invaluable to their reload speeds and with a $30 price tag, it is one of the cheapest pieces of equipment you could add to your AR furniture.

The B.A.D. Lever allows for the operator to control the bolt release on the left hand side of the weapon with your trigger finger on the right. It takes minutes to install and as the name implies, it does this by utilizing a lever. When the weapon runs dry, the lever will lock out and once you insert a fresh mag, you can operate the B.A.D. Lever with a simple flick of the trigger finger. Unfortunately for you lefties out there, this product won't be of much use to you on a standard AR, but for righties, it is a godsend!

I started running with the B.A.D. Lever three years ago. Like any new piece of gear, mishaps were to be expected. I would sometimes hit the lever prematurely and send the bolt forward before my mag was set and would have to use the charging handle to reload. Over time and with practice, I began to enjoy the benefits of this device. On the firing line it became obvious how much faster it had made me when I compared myself to my teammates. Let me tell you, it's a good feeling when you are up and running while your buddy next to you is still fumbling to hit his bolt release!


The Magpul B.A.D. Lever is a simple and reliable product in a market that is otherwise cluttered with more complex pieces of gear. It's price makes it a must for anyone looking to speed up their reloads and get back in the fight. If you haven't tried the B.A.D. Lever yet, do yourself and your team a favor and test it out for yourself!