share

Showing posts with label sight. Show all posts

Saturday, April 28, 2012

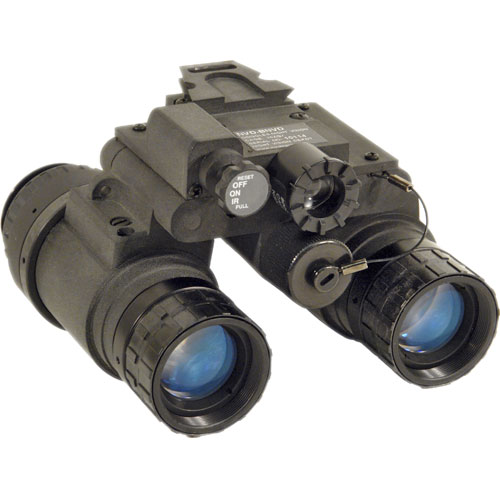
Dual NVGs Vs. Mono NVGs

There's no doubt that the ability to function in the dark is key to combat success. The more we are able to turn the darkness into our ally, the more of a threat we become to the enemy. Therefore, utilizing helmet mounted NVGs (Night Vision Goggles) is vital to mission success. There are two main options you have to consider dual for both eyes or mono for one. Both work excellent for their purpose, but one is not entirely better than the other. It all comes down to necessity for the mission.
 
Dual NVGs:
This is an excellent choice for when you expect to be operating in the dark for an extended period of time because the eye relief is excellent unlike the mono's. Combine this with a weapon mounted IR laser and you become deadly on the battlefield. Dual NVGs allow the user to quickly scan, acquire targets, and handle them accordingly without having to stress one eye to do all the seeing. The drawback to the dual NVGs, however, is that they cover both eyes. While this as an excellent feature, it can also be its greatest error to the user in contingency situations. For example, if the dual NVG's go down, you are forced to use your flashlight and give away your position, or wait for your eyes to adjust which takes approximately 20 minutes. Another drawback is that should you have to use your weapon's optic because your laser went down or you never had one to begin with, your ability to see your target is lost as your eyes have not been able to adjust. Also, I would strongly recommend counter weight for the back of your helmet as these are heavier than the monos.
 
Pros
  • Excellent eye relief
  • Perfect for long night operations
  • Feel more natural to the user
  • Works well with weapon's IR laser
Cons
  • Eyes will have to adjust to dark should NVG's malfunction
  • Heavier
  • Renders weapon optics useless
 
Mono NVGs:

 
These are the most common NVGs on the market today, and for good reason. Mono NVGs are the most versatile night optics a modern day warrior can own. The most popular of these is the PVS-14, which is used primarily by the military and law enforcement. Unlike the it's bigger brother, the duals, the mono only covers one eye, usually the non aiming eye. While this can cause some users eye stress by having to focus on one eye, it does leave the eye not being  covered ready to negotiate the dark should the NVGs malfunction. This also makes your optic readily accessible with the monos up or down or you prefer not to use an IR laser. Should you have to adjust focus, a simple turn on the ring around the lens is all you need to do. Another benefit to the mono is that they take up considerably less room and can be easily stored in your ruck sack. The problem that I have had with monos is that scanning your surrounding area takes longer since you are looking through a narrower field of view and the clarity may also suffer. Since preferences vary drastically, the mono is a good choice of NVG as there are various different mounts to choose from and other forms of utilization such as a weapon mount if your optic has an IR setting.

 
Pros
  • Highly versatile
  • Only disrupts on eye's night seeing ability
  • Easily stored
  • Multiple gear options
  • Leaves weapon optic as an option
Cons
  • Slightly more eye strain
  • Narrower field of view
  • Clarity issues
The mission will always dictate the proper gear needed for success, but if you are debating between dual and mono NVGs, it is important to know the benefits of each. This way you will be making an informed decision on what to carry into the field. The most important question to consider is "Will this turn the darkness into the best ally that it can be?" Consider this when making your selection and you will be much more successful in your night time operations. Best of luck!

Wednesday, April 25, 2012

5 Quick Upgrades to Improve Your AR-15 Performance


The AR-15 is perhaps the most dynamic and customizable weapon system on the free market today. The amount of gear you can slap on this war horse is almost endless and can become pretty pricey, but how much do you really need to improve how your weapon handles? The truth is that you only need 5 pieces of gear (most relatively cheap) to instantly improve your AR; a sling, foregrip, buffer, buffer spring, and a muzzle break. Before you go investing in that spendy ACOG or EOTech you've been eyeing, try these products first.


The Sling (APRX $30):
The sling is commonly associated as being the means by which you carry your weapon, but if utilized correctly it can provide support to counter the recoil. While slings come in multiple makes and models, I prefer the 2-point slings because of their versatility and simplicity. I’ve ran with the Viking Tactics 2-point sling for years and I love it! To turn your sling into a support base for your shooting position, all you have to do is tighten it to reduce the play in your rifle when aiming down the sights. When preparing to shoot, you should be using a little muscle to keep the sights steady. This is when you know that you have a steady base to shoot from.


The Foregrip: (APRX $65):
Adding a fore grip to your AR-15 will instantly provide you with a steady place to put your support hand on to allow for faster sight acquisition and stability. I am a huge fan of the Tango Down stubby vertical grip. I feels more natural in the hand and the bottom unscrews to allow for storage of extra batteries for electronics. If you do not like the vertical grips, Magpul makes an angled grip that relieves wrist strain for those who prefer not to install traditional foregrips. This is a simple part that takes approximately a minute to install and can benefit the shooter almost immediately. I talk more about the proper use of the foregrip in my post, You're Using Your Foregrip Wrong! Here's Why...

The Buffer (APRX $20-30)
Here is where it starts getting fun because this is a quick swap that will noticeably reduce your recoil the next time you shoot. The manufacturer's buffer, in my opinion, is just a little too light. Installing a heavier buffer will reduce the amount of force being thrown back at you when you shoot since there is more resistance because of the increased weight. If you look at the flat end of it in a Colt AR-15 for example, you will probably see something to the effect of “H1.” This is the lightest buffer they install in their AR's. The next heaviest buffer plug would be the H2. They do make H3 buffers that are the heaviest, but I would shy away from these as they have just a little too much weight for the common AR-15. There are a few other buffer out there, but the one I prefer is the Spike's ST-T2 buffer because it uses tungsten powder as opposed to weights. Just a personal preference, but I am happy with it's results.

The Buffer Spring (APRX $8)
Of course with your heavier buffer, you are going to need a better buffer spring to go along with it. I'll save you all hours of researching and tell you to just go with the Sprinco Blue Spring. This is just strong enough to counter the added weight without causing cycling issues. To date I have put around 3,000 rounds through my AR-15 using the Blue Spring, and I've yet to have ANY issues with it. I have heard of some people using their Red Spring, which is heavier, but I don't see a need for any extra resistance that could cause malfunctions. Even if you don't plan on getting a heavier buffer, the buffer spring needs to be replaced eventually, so take my advice and get yourself a Sprinco Blue Spring.

The Muzzle Break ($135-165):
Muzzle breaks come in many forms from multiple manufacturer's (I'm currently running the SureFire MB556K on mine and I love it!) but they are all intended to reduce the recoil for fast follow-up shots. This is the only part I have listed here that you may consider pricey depending on your budget, but unlike all the other goodies I've talked about, this is the one mod that will drastically boost your shooting performance. Muzzle Breaks are fairly easy to install given the right equipment such as the Hammerhead Rifle Tool. Simply unscrew the existing muzzle break, add the necessary washers, apply a little lock tight, and screw your new break on. This is the most crucial product you will need if your aim is to minimize the felt recoil of your rifle. It makes the weapon a dream to shoot and your follow up shots will dramatically improve!

By installing this equipment on your AR-15, you will be well on your way to better shooting and sitting on Cloud 9 in control heaven! I hope that the named gear suggestions I have made will help you in your search and that the next time you are at the range you will have a better confidence in your weapon and shooting ability.


Tuesday, April 24, 2012

You're Using Your Foregrip Wrong! Here's Why...

Nothing triggers my pet peeve nerve more than seeing someone on the firing line who looks like their are trying to strangle their foregrip. It is an all too common mistake that significantly reduces the effectiveness that having a foregrip can produce. I know many AR shooters who have foregrips on their weapon system and they utilize it in this manner. Before you start running a foregrip or before you continue teaching yourself bad habits, allow me to correct you...

The Correct Method:

First of all, the foregrip should be placed on the bottom of your weapon system (yes, sadly I have seen them mounted on the side) and they should be located as far forward to the tip of the barrel as possible. Now, instead of gripping it, use it as support for your lower three fingers on your support hand. If you have a swivel mount for your sling, you can create a nice nook for your thumb and forefinger if you have it placed just above the foregrip. You will notice that your hands are now in the same configuration as if you were shooting a pistol, just farther apart.


WRONG!


CORRECT


        CORRECT
           (reverse angle)

Why This is Correct:

If you grip the foregrip with the whole fist, you are doing little to improve your accuracy or stability. The fist grip creates a bend in your elbow that will be a focal point for the recoil and it will take longer for follow up shots. If the foregrip is located closer to the magazine well, the recoil will be hardly be reduced at all as there is much of the rifle that is uncontrolled. Although it may look cool having the foregrip farther back, the energy generated from your shot will cause your point of aim to be thrown off. Having your support hand in the position I have described will allow you to quickly attain your sight acquisition and manage the recoil as there is little left of the weapon that you do not have control of.

Now that you are fortified with the knowledge of the correct posture for utilizing the foregrip, you can correct your buddies and see for yourself how they will instantly improve on the firing line. Have fun training and shoot straight!